> For the complete documentation index, see [llms.txt](https://docs.powerembedded.com.br/llms.txt). Markdown versions of documentation pages are available by appending `.md` to page URLs; this page is available as [Markdown](https://docs.powerembedded.com.br/en/technical-documentation/installation/power-bi-embedded.md).
# Power BI Embedded
To facilitate the Power Embedded installation process, we have created this tutorial to help our customers install Power Embedded.
### Prerequisites for installation
As **Power Embedded** is a **SaaS**-based system, you will not need to hire or manage any server, application, or database. You will simply use the software as a service.
To set up Power Embedded in your company, we need the following prerequisites to be met before we schedule the installation:
* Azure user account with permission to create Fabric or Embedded capacity.
* Azure user account with permission to create groups and applications in Azure AD.
* Azure user account with the "Fabric administrator" role to access the [Power BI administration portal.](https://app.powerbi.com/admin-portal/tenantSettings)
During the system installation meeting, which is held with the client, we need a user with the permissions listed above to be provided, or someone from the client's team with these permissions who can share the screen and perform the actions that will be instructed.
### How to create the Power Embedded user in Azure AD
To create the application that will be used by Power Embedded, you will need to access [this link](https://portal.azure.com/#view/Microsoft_AAD_IAM/ActiveDirectoryMenuBlade/~/RegisteredApps).
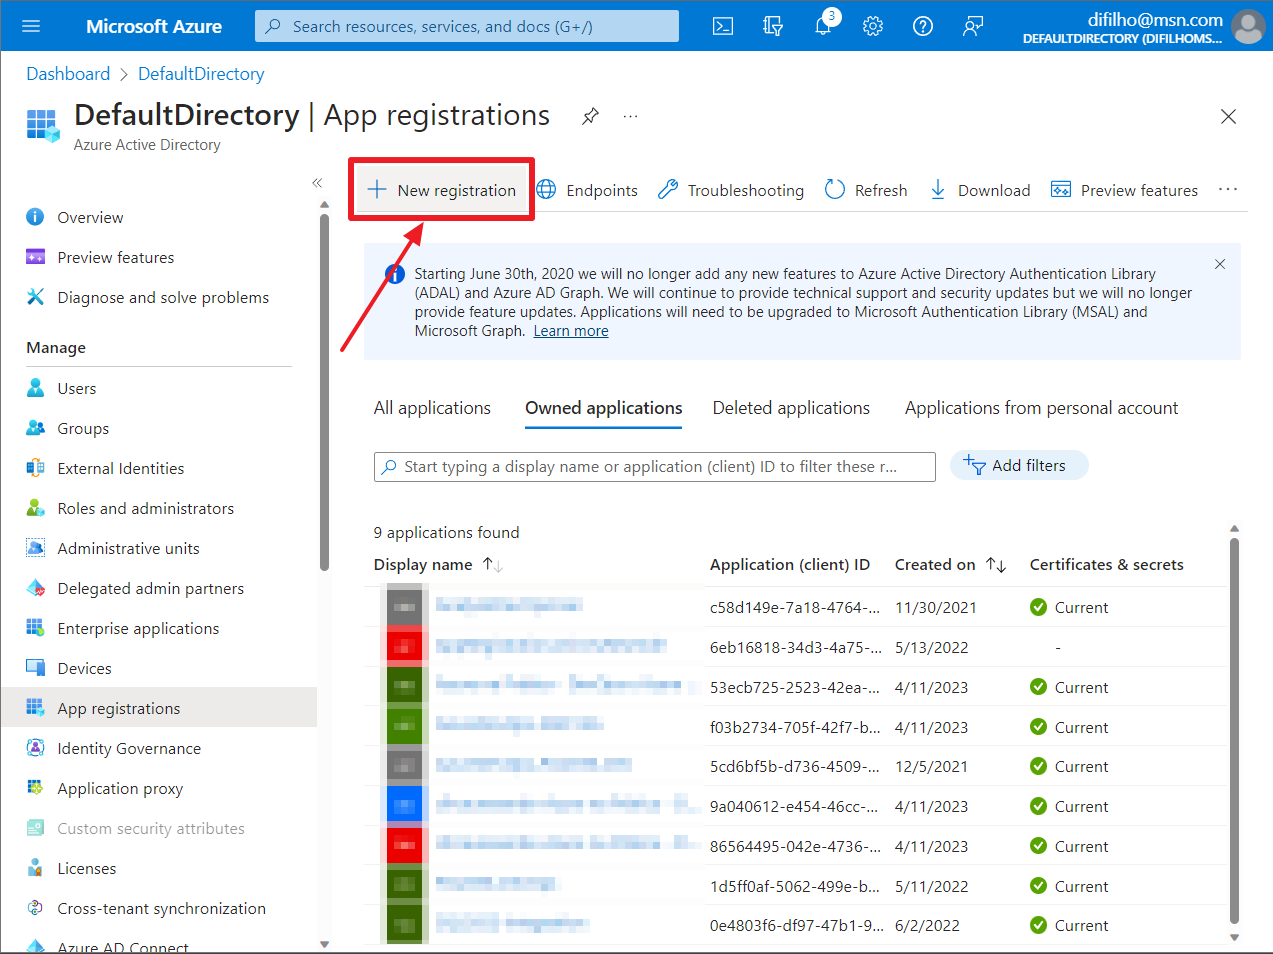
On the screen below, click the "New registration" button.
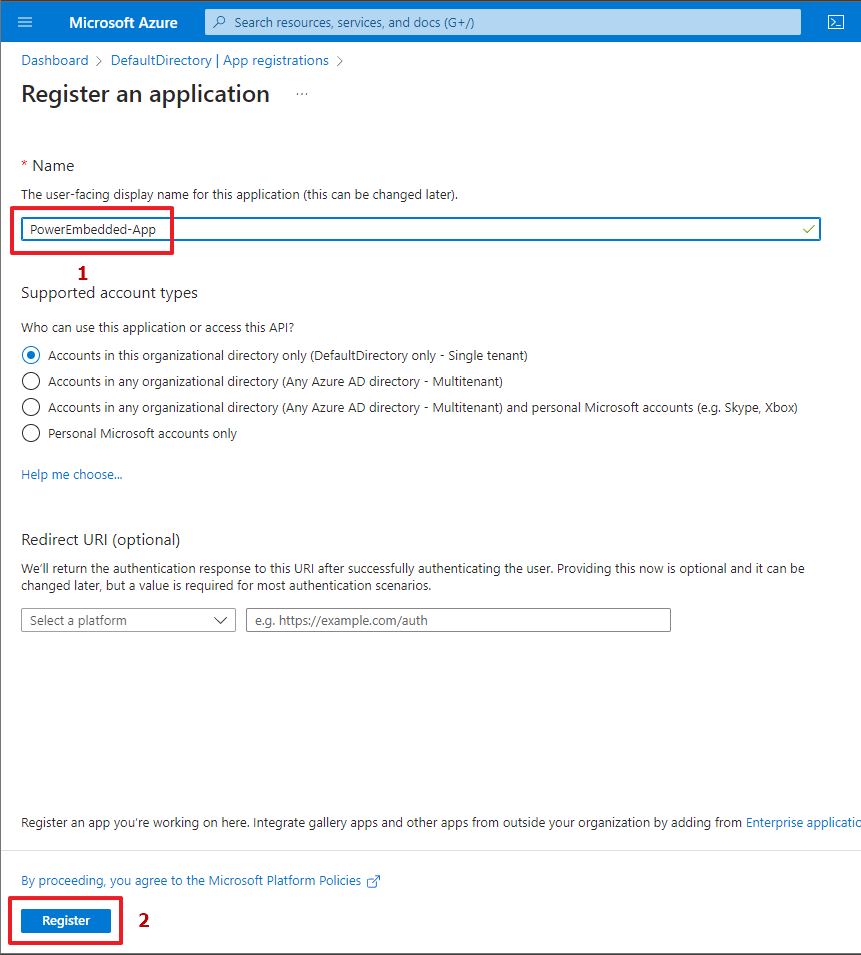
Now you should choose a name for the application you will create in your Azure AD. The name is up to you.
After that, click the "Register" button at the bottom of the page.
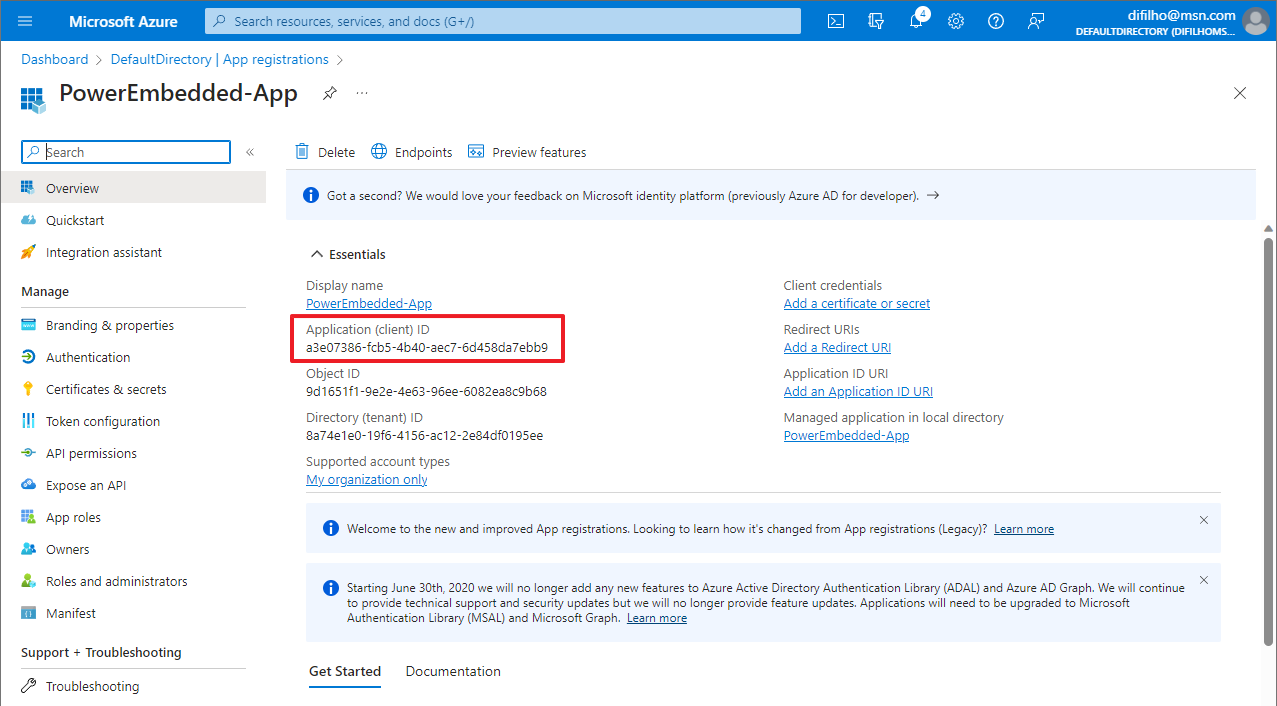
After creating this application, you will be directed to the overview screen.
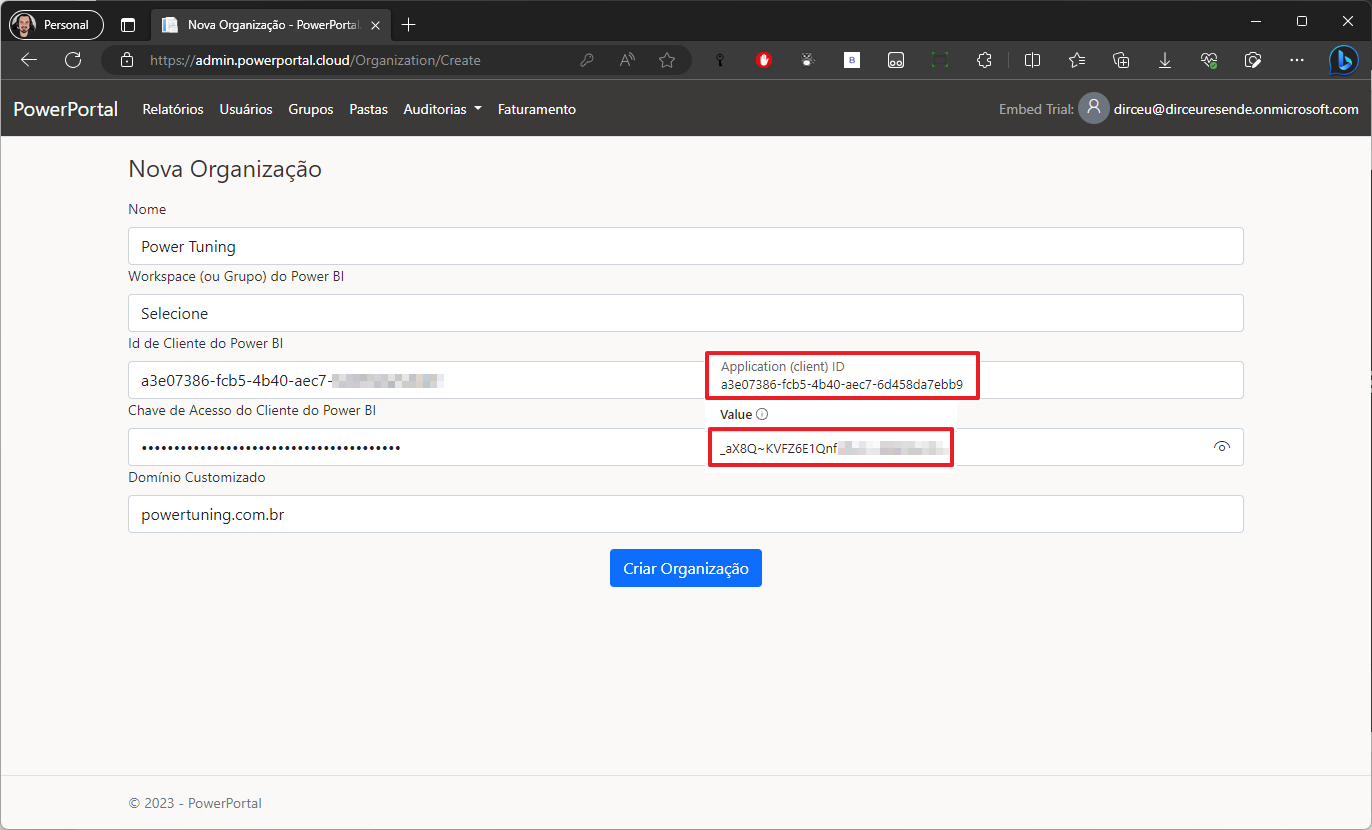
Copy the value of the "Application (client) ID" field and save it in a notepad. This key is what you will paste in the "**Power BI Client ID**" field in the Power Embedded organization configuration.
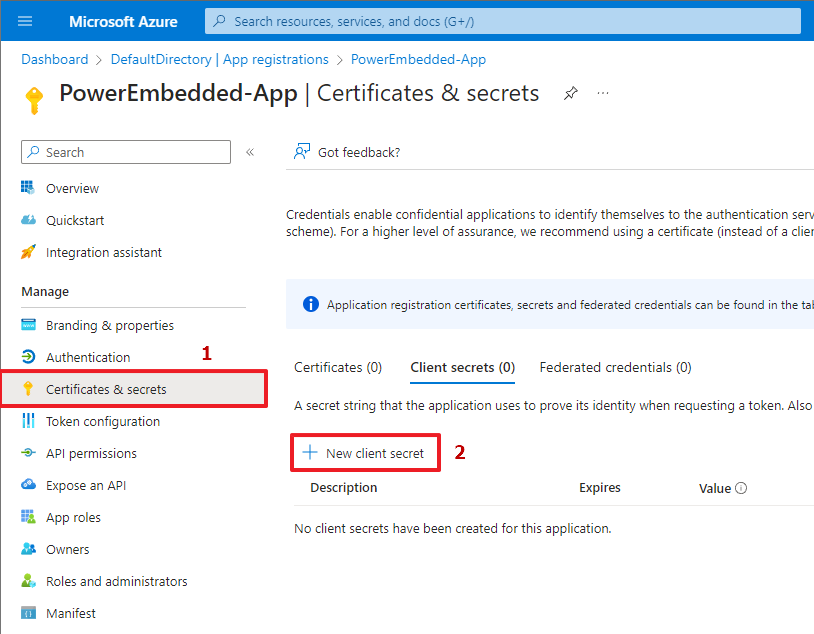
Now click on "Certificates & secrets" and then click the "New client secret" button.
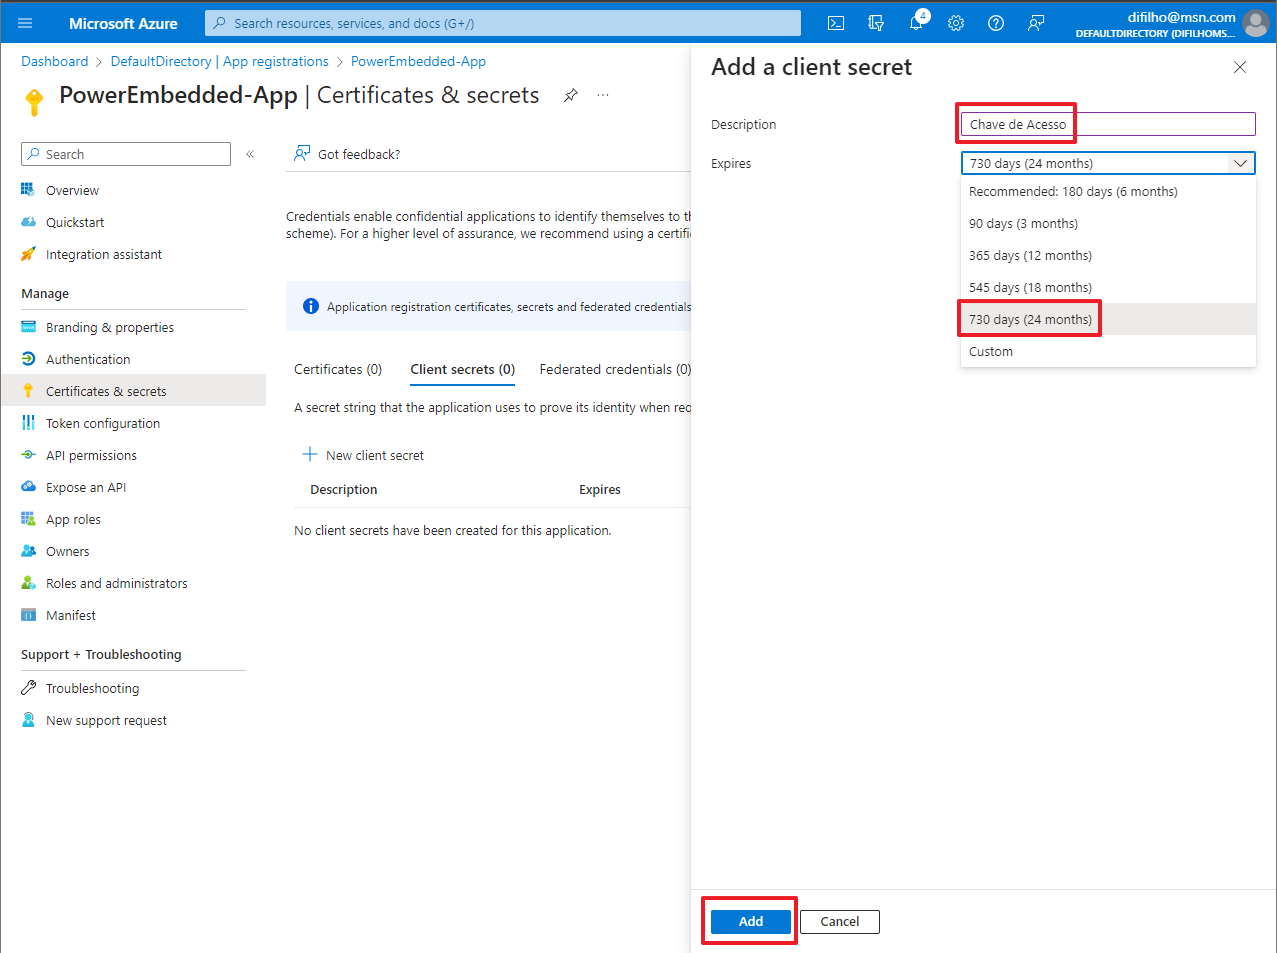
On the new screen that opens, type a description for this secret (as per your preference) and select the validity of this secret.
I suggest choosing 24 months so you only need to worry about this expiration after 2 years (Yes, after the chosen period, this secret will expire and the system will STOP working. You will need to generate a new secret and update it in Power Embedded).
Now click the "Add" button at the bottom of the page.
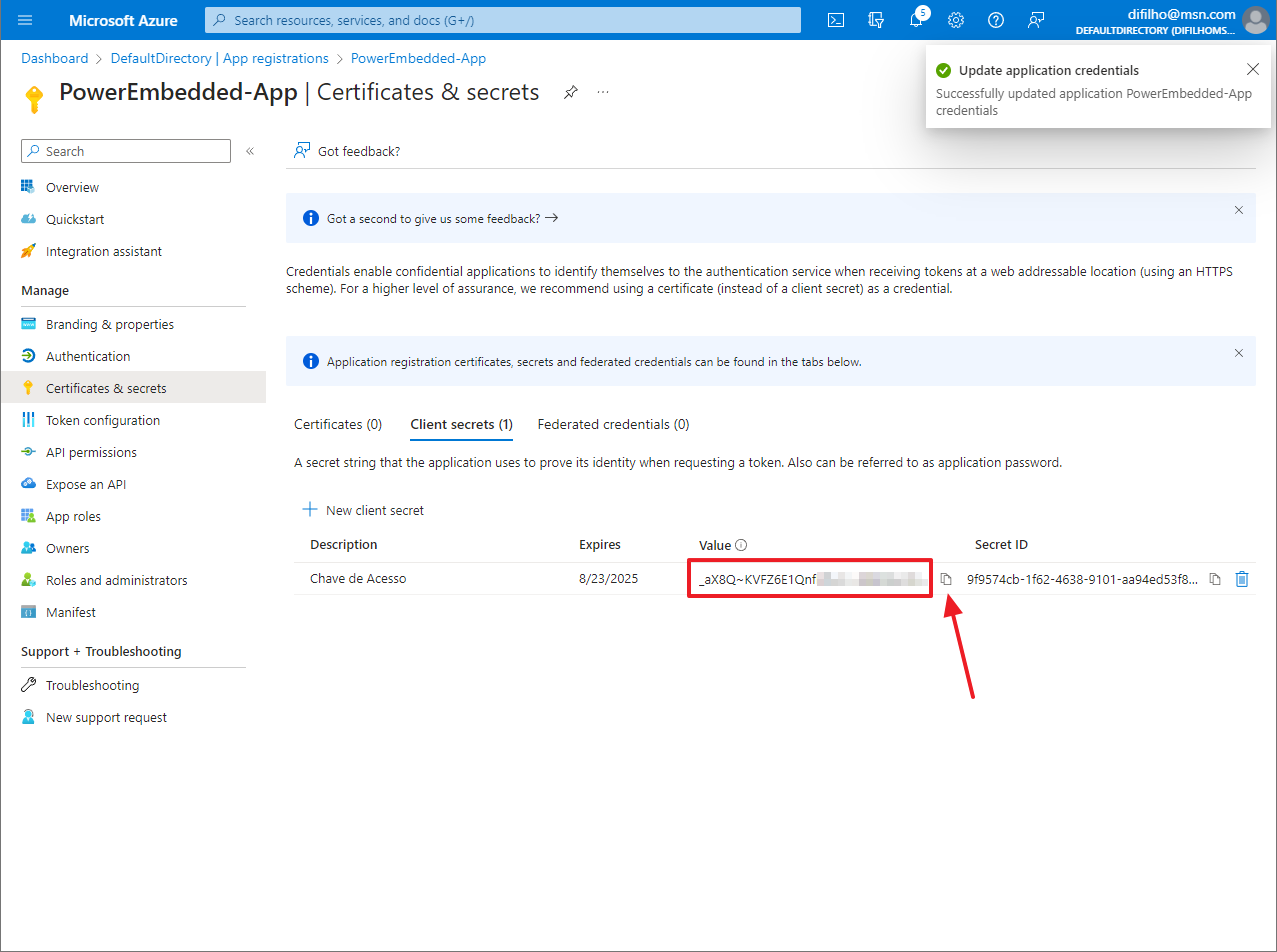
Now copy the generated "Value" field. There is a copy button next to this key.
Note and keep this key well, as this will be the ONLY time you will be able to see it. If you lose this key, it will not be possible to recover it: You will need to generate a new secret and update it in the system.
This value that I highlighted and you copied, you should paste it in the "**Power BI Client Access Key**" field on the Power Embedded configuration screen.
### Synchronizing Azure AD (Entra ID) users and groups
To integrate Power Embedded with Azure AD (Entra ID) and import users and groups.
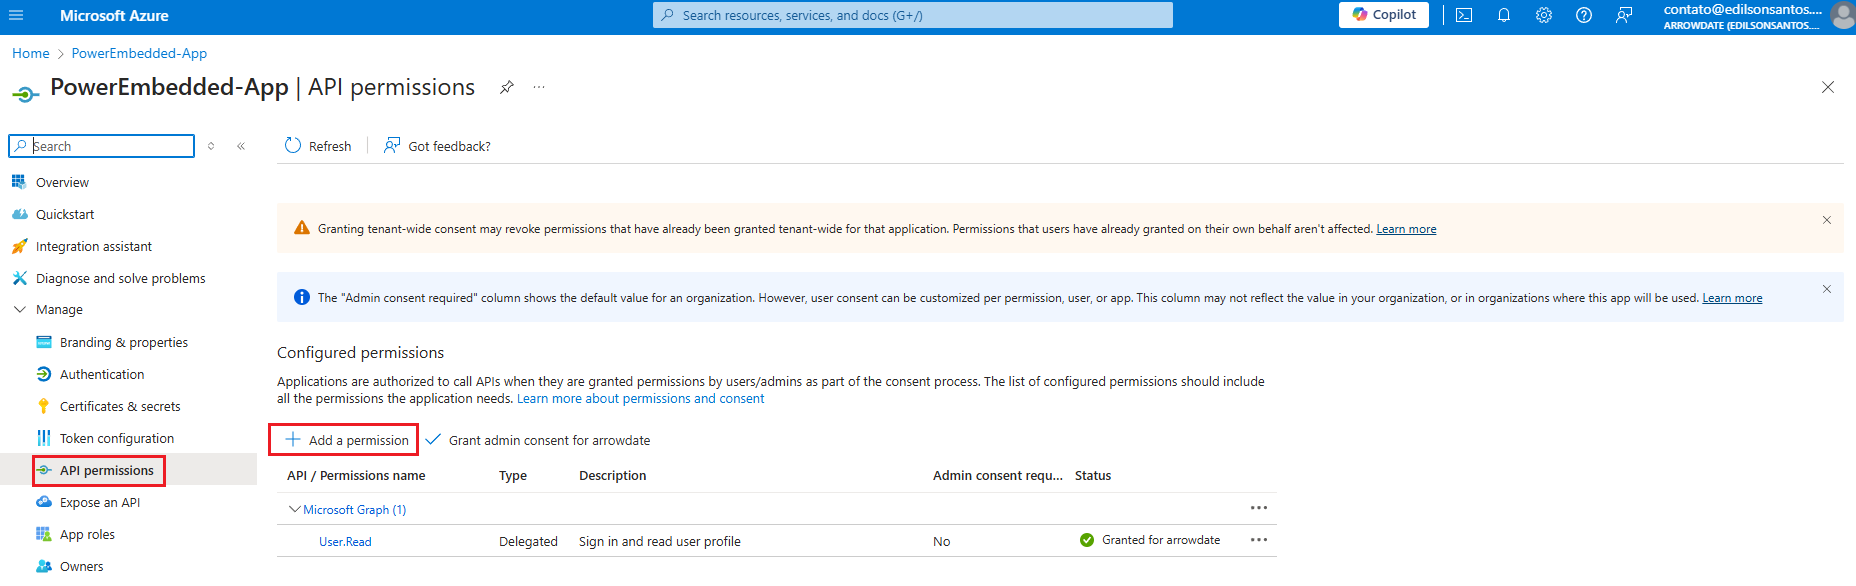
On the same application registration screen, click on "API permissions" and then on "Add a Permission".
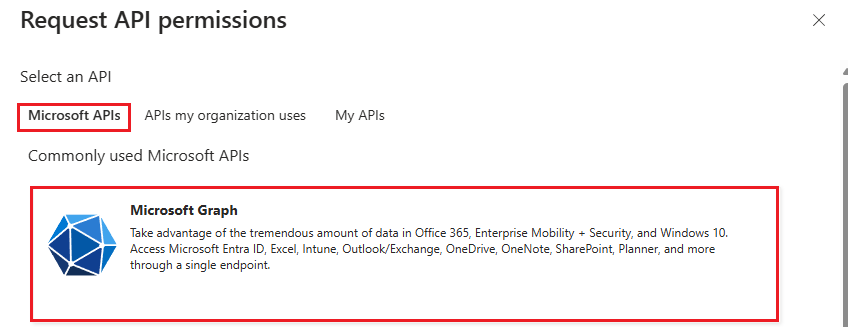
On the next screen, select the "Microsoft Graph" option.
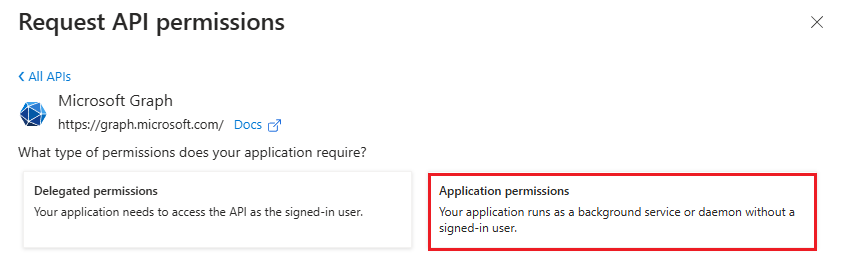
Then select the "Application permissions" option.
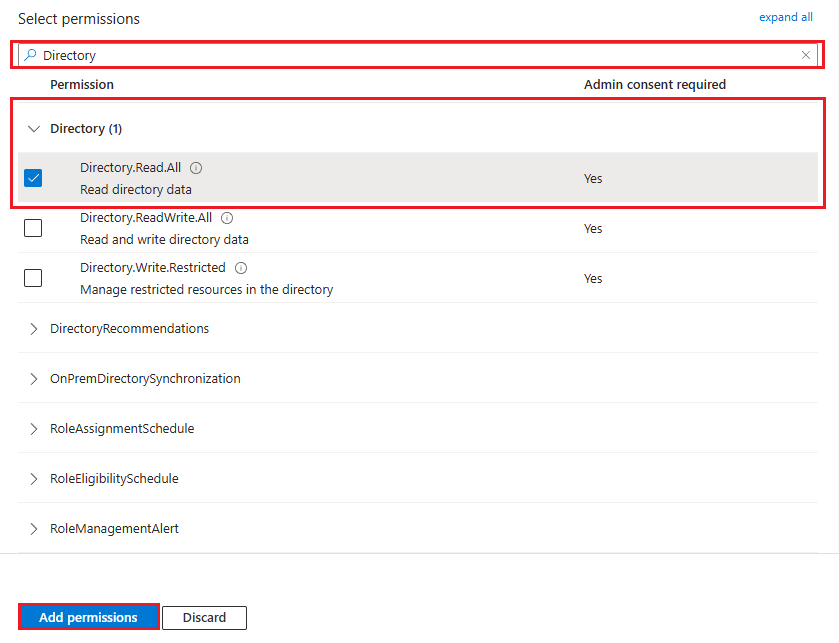
On the next tab, search for "Directory" and select the first option "Directory.Read.All" and click "Add permissions".
If you prefer to use a less privileged permission, you can grant only the "User.Read.All" and "Group.Read.All" permissions.
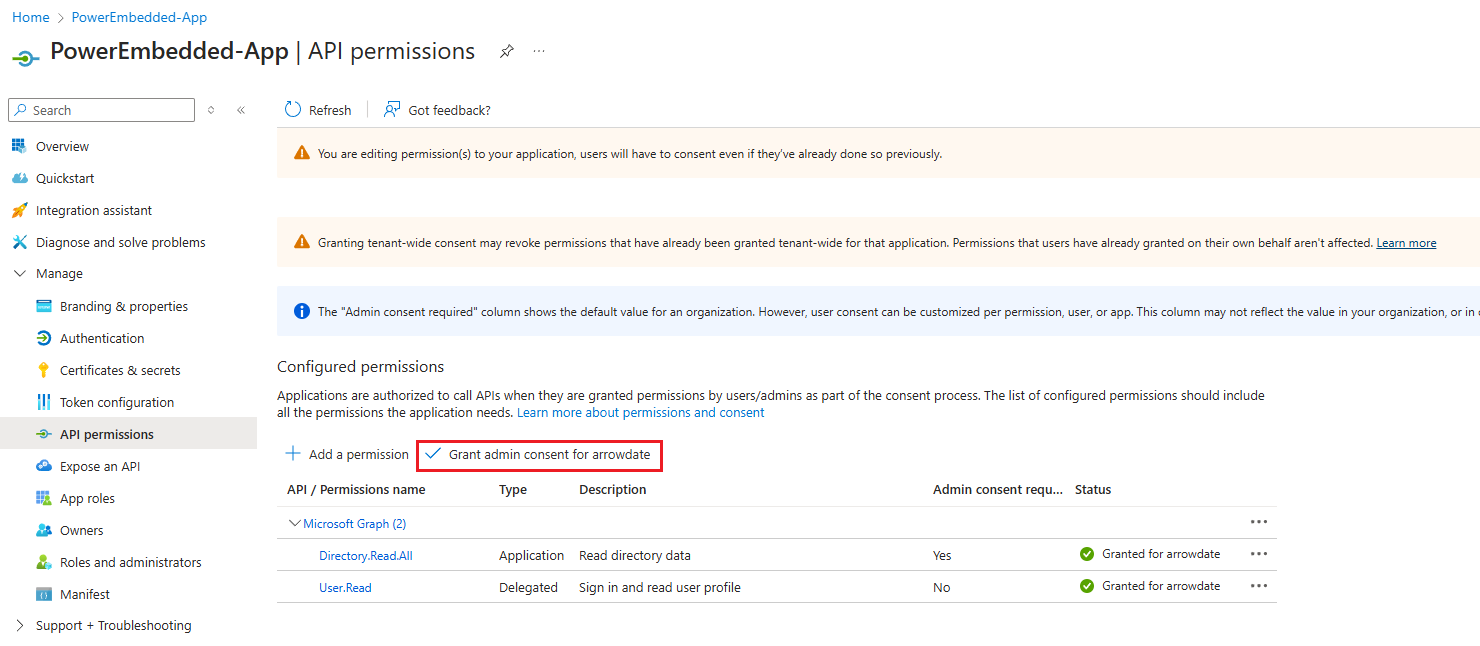
To finish, simply grant admin consent by clicking "Grant admin consent for".
Done, once you complete the next steps you will be able to import users and groups from Azure AD (Entra ID) into Power Embedded.
### Adding the Power Embedded user to a new AD group
To grant permissions in the Power BI Administration Portal to the Service Principal you just created, it must be part of an Azure AD (Entra ID) security group.
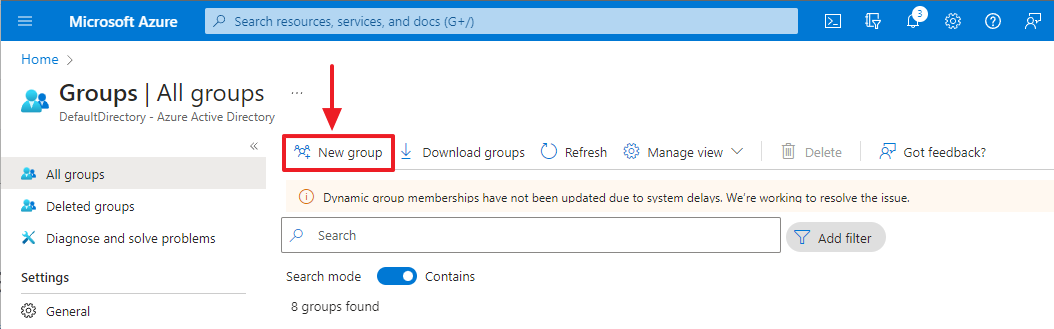
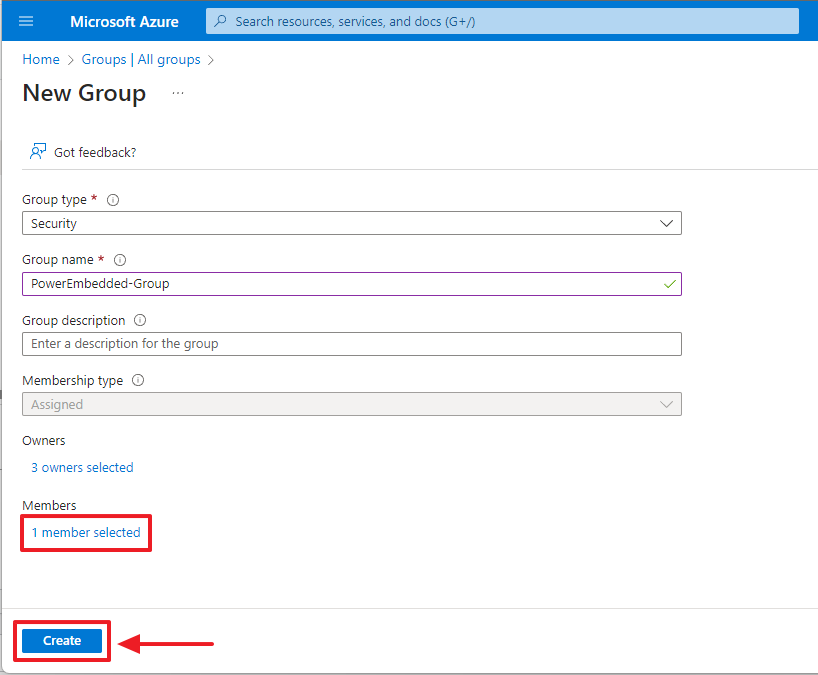
To do this, access [this link](https://portal.azure.com/#view/Microsoft_AAD_IAM/GroupsManagementMenuBlade/~/AllGroups) and click the "New group" button.
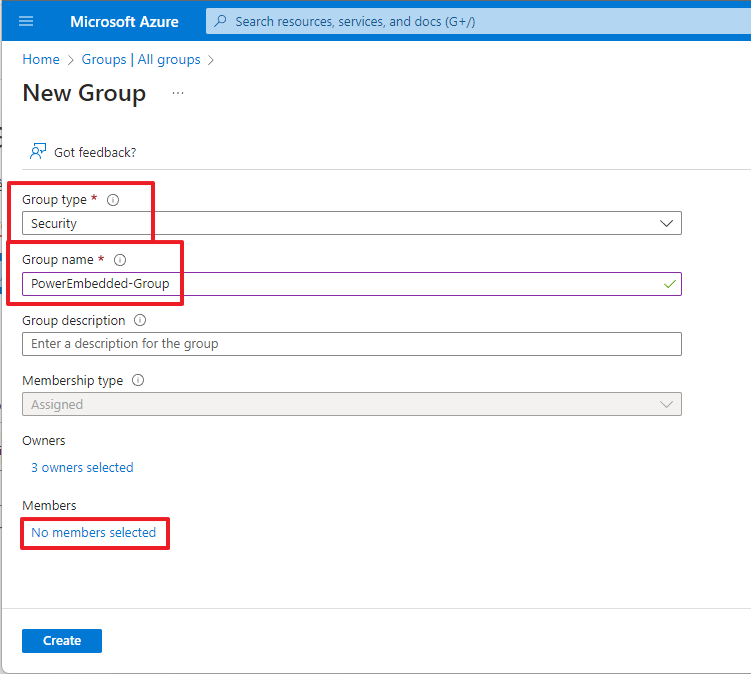
Select the "Security" option in the "Group type" field and type a name of your preference for this group we are creating.
Click the "Owners" link and add the people who will be responsible for Power Embedded.
Click the "No members selected" link in the "Members" category.
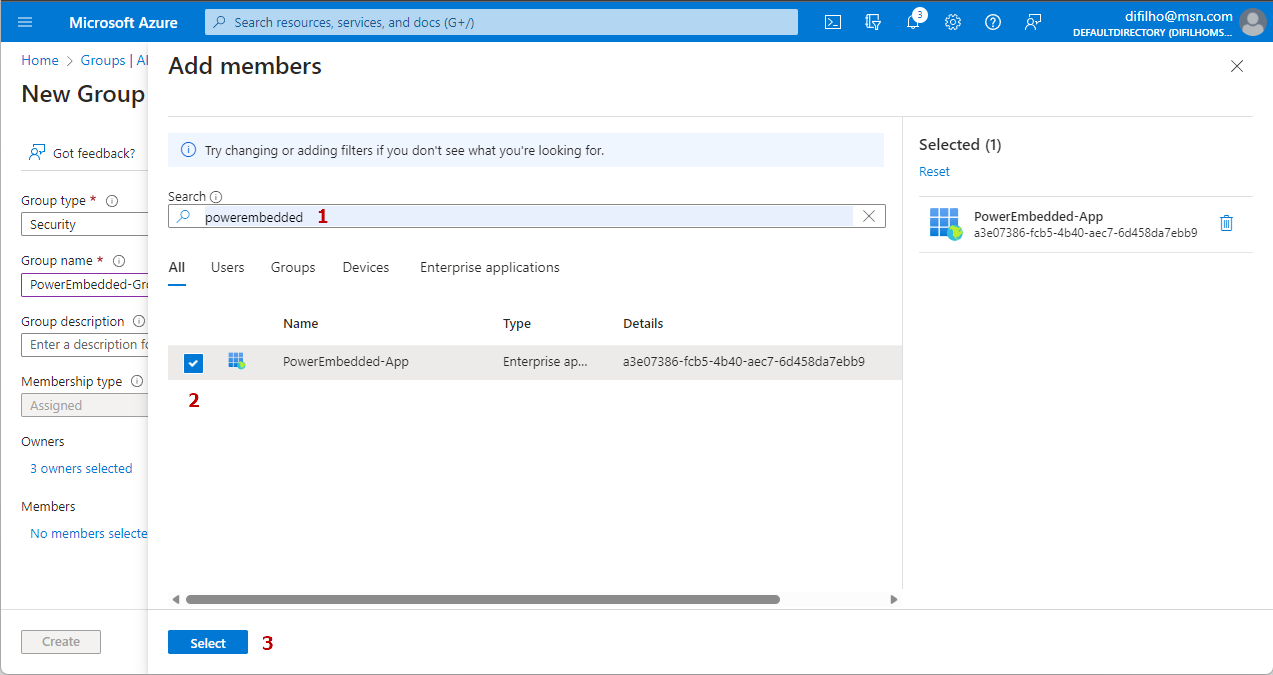
On the screen that opened, type the name of the Service Principal you created to filter. Select the Service Principal from the list and click the "Select" button at the bottom of the page.
Now that you have selected the member to add to this new group, click the "Create" button at the bottom of the page.
### How to create the Power BI Embedded capacity
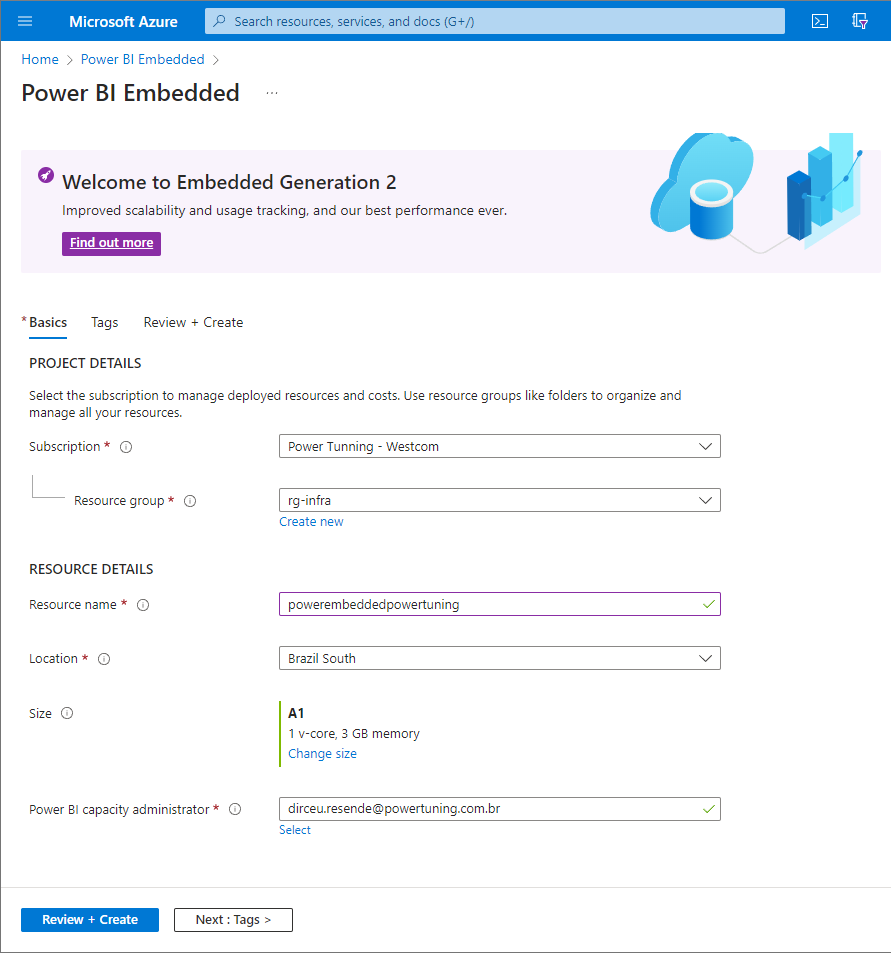
To create the Power BI Embedded capacity, use [this link](https://portal.azure.com/#create/Microsoft.PowerBIDedicated).
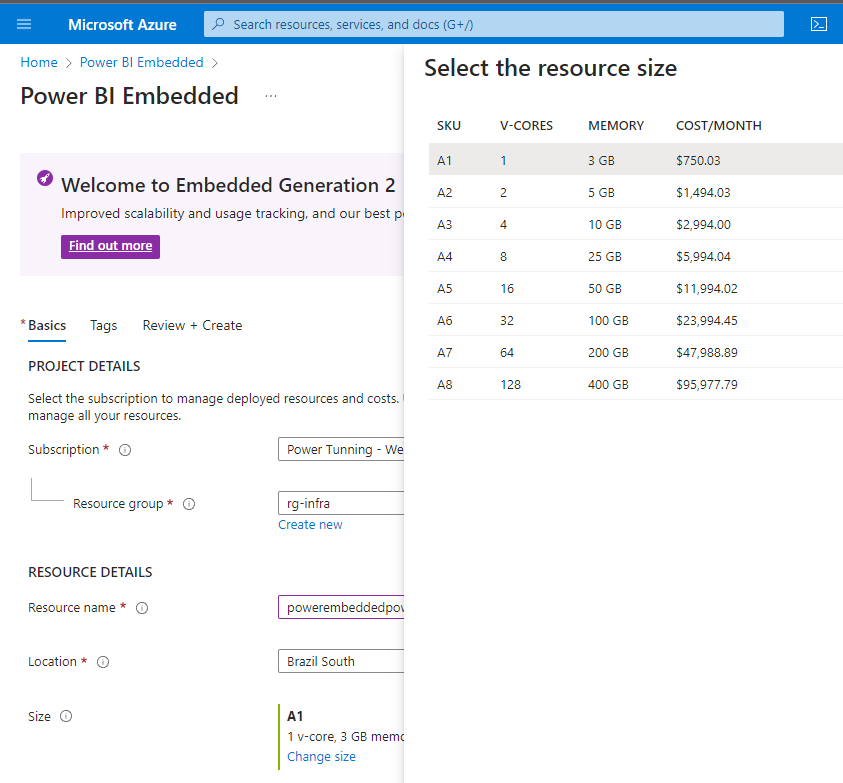
Select your subscription, the resource group you will use, give a name for your Embedded capacity (remember that the name must be unique for the entire selected region) and select the region where the resource will be created.
Remember to specify the size of the capacity you will create and click the "Review + Create" button and then the "Create" button at the bottom of the page.
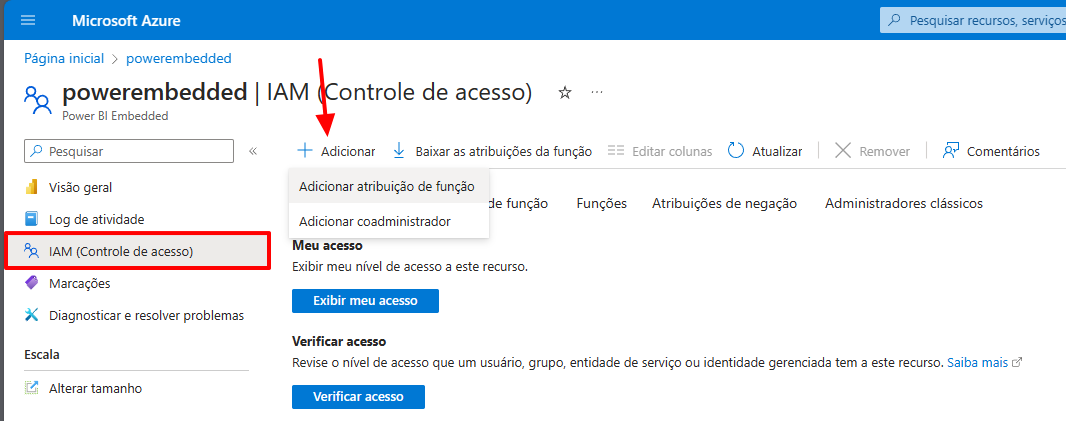
For the capacity optimization feature to work correctly, you need to add the necessary permissions on the capacity for the Power Embedded user/group.
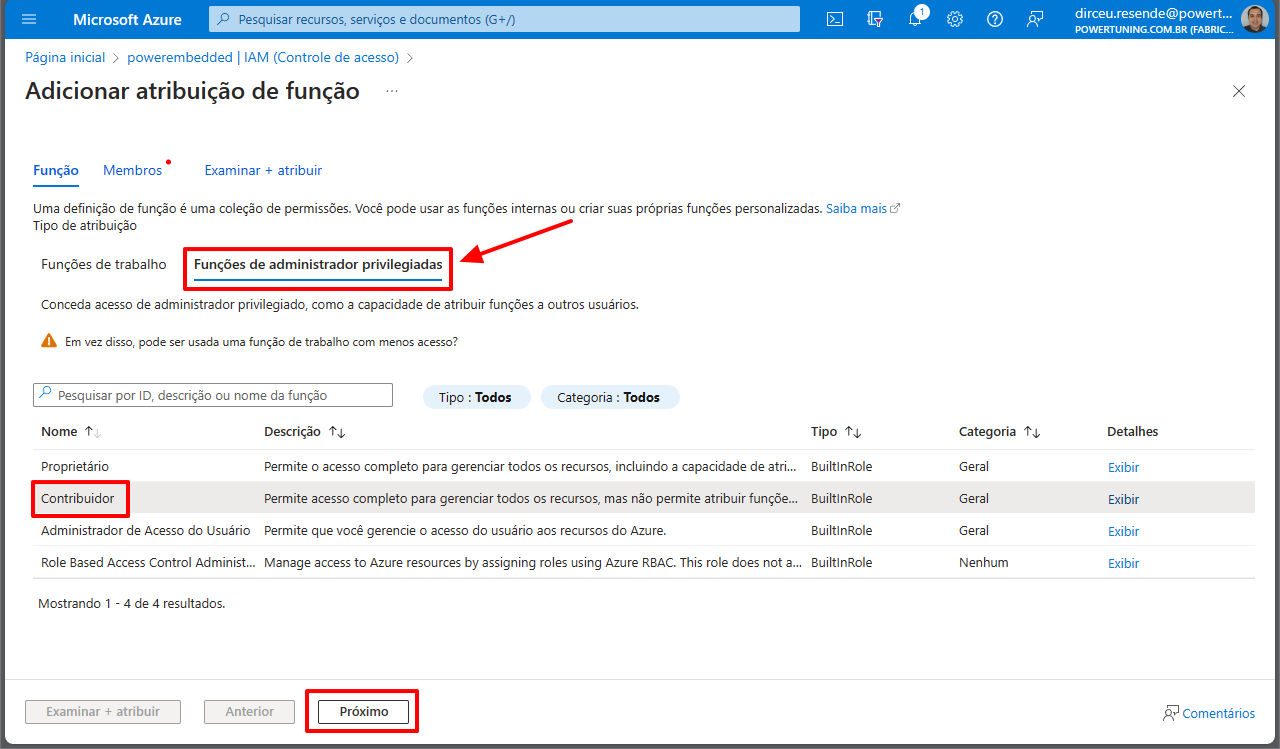
Access your Embedded or Fabric capacity in the Azure portal, select the "IAM (Access Control)" item in the left menu, then click the "Add" -> "Add role assignment" button.
Click the "Privileged administrator roles" tab, check the "Contributor" role and then click the "Next" button.
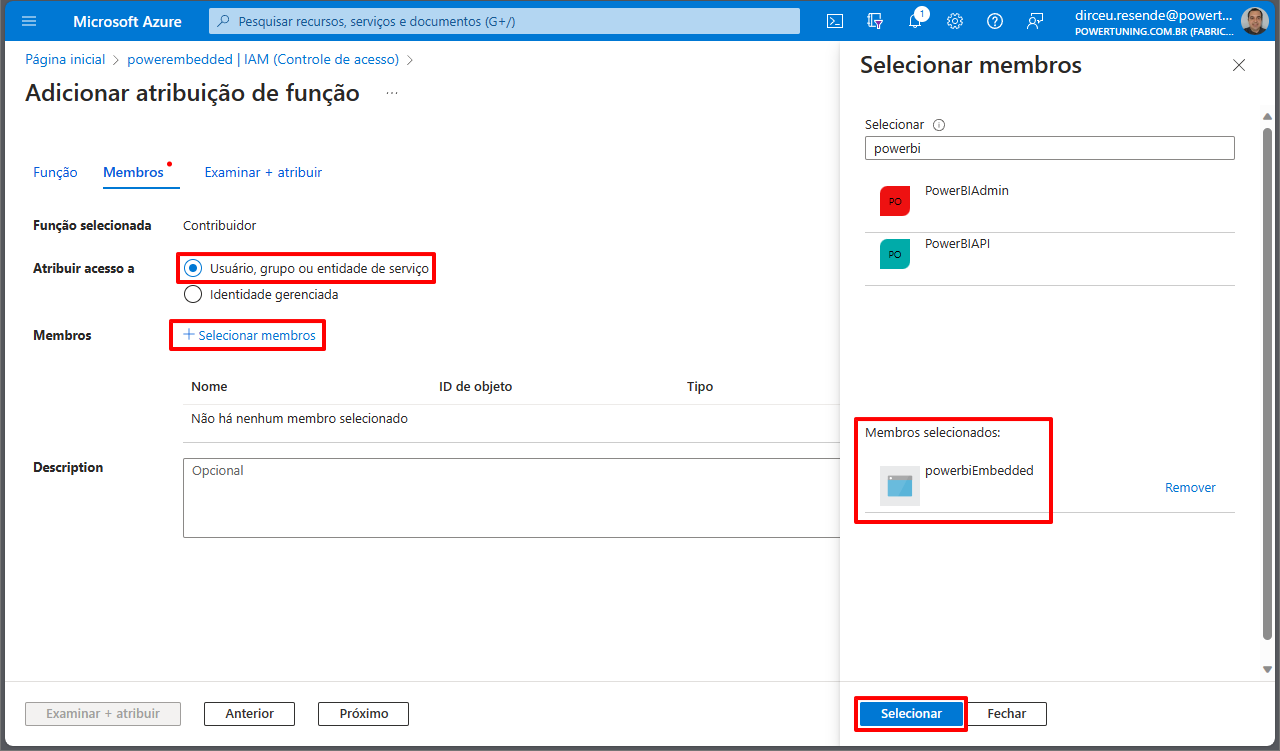
Check the "User, group, or service principal" option, click the "+ Select members" link, locate and select the Power BI Embedded user or group you created and click the "Select" button.
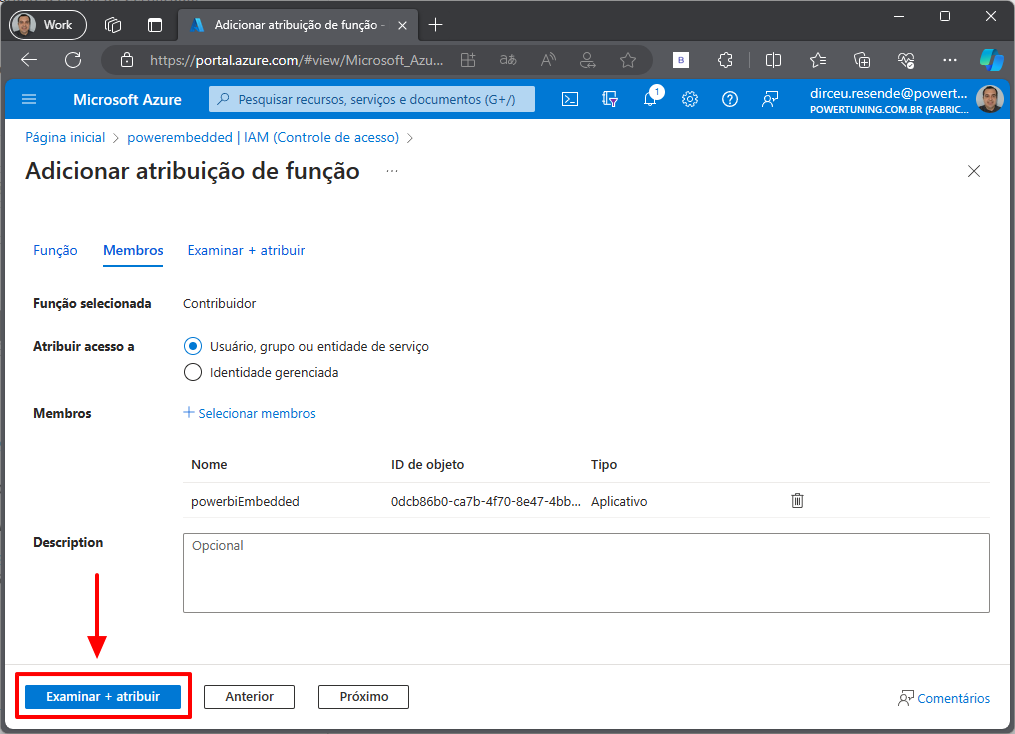
Click the "Review + assign" button and on the next operation summary screen, click that button again.
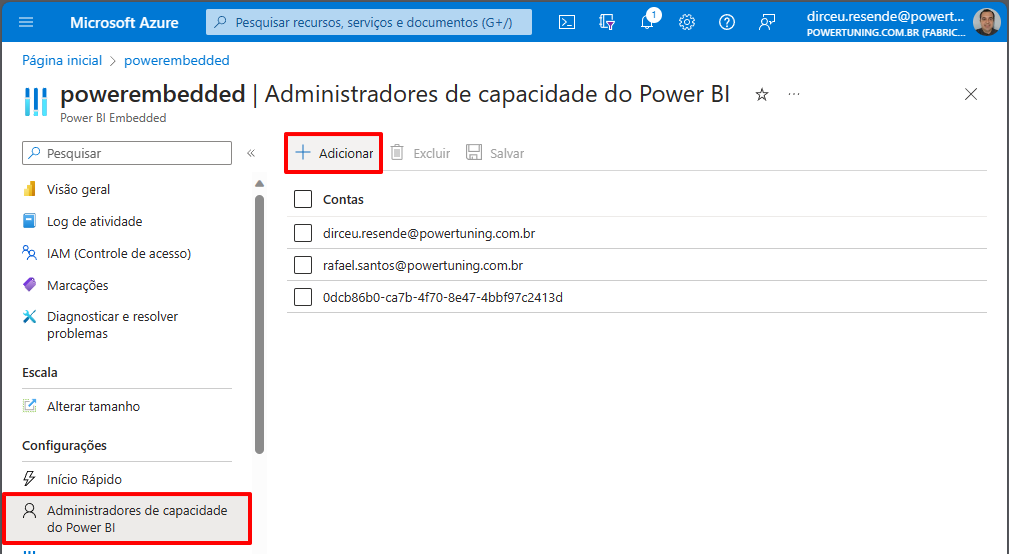
Now let's add the Power Embedded user as a capacity administrator.
To do this, click the "Power BI capacity administrators" item in the left menu.
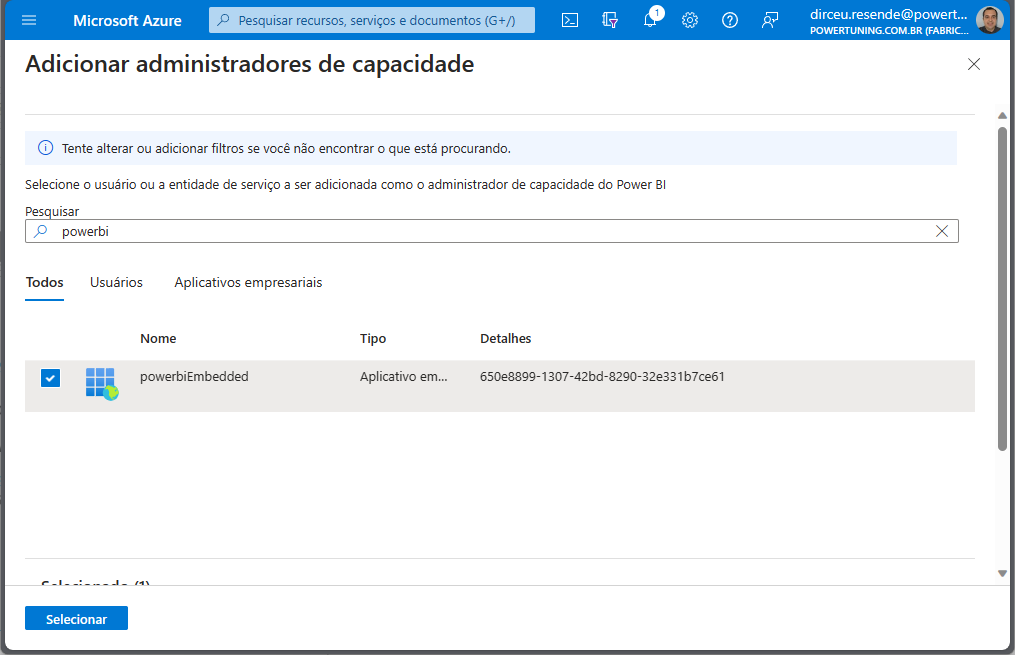
Locate and select the user you created for Power Embedded and then click the "Select" button.
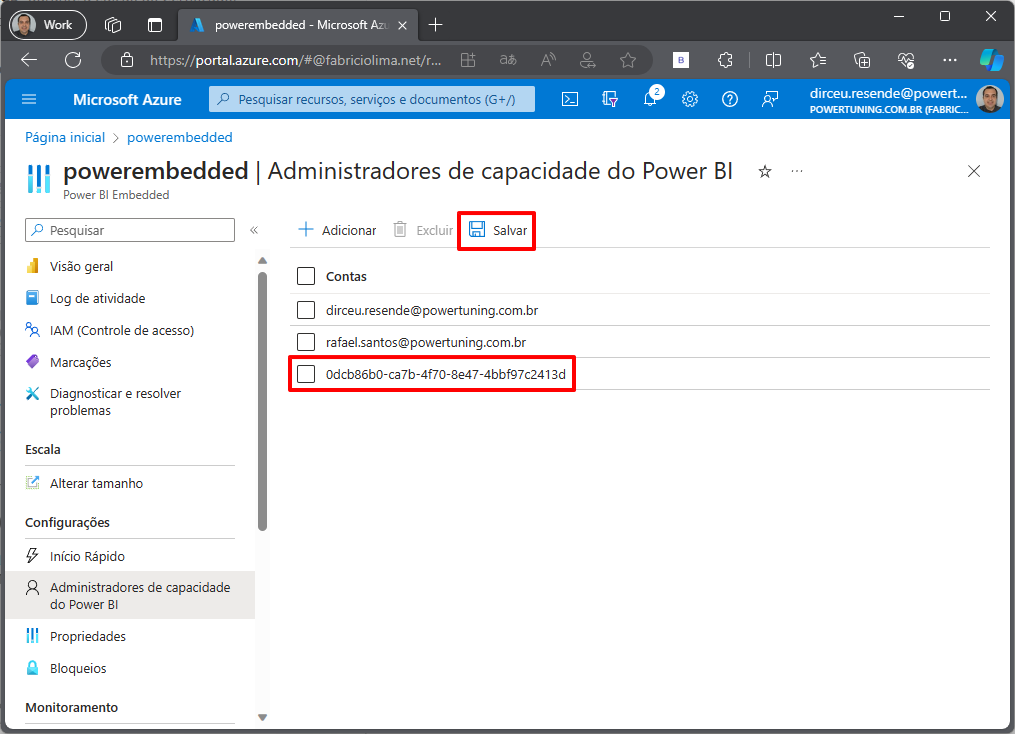
A new record containing the object ID of the Power Embedded service principal will appear in the list of capacity administrators.
**Don't forget to click the "Save" button to confirm the change.**
### How to grant the necessary permissions in the Power BI Administration Portal
Using a user with Power BI administrator permission, access [this link](https://app.powerbi.com/admin-portal/tenantSettings).
Scroll down the page until you find the "Developer settings" section (or press Ctrl+F and search for "api").
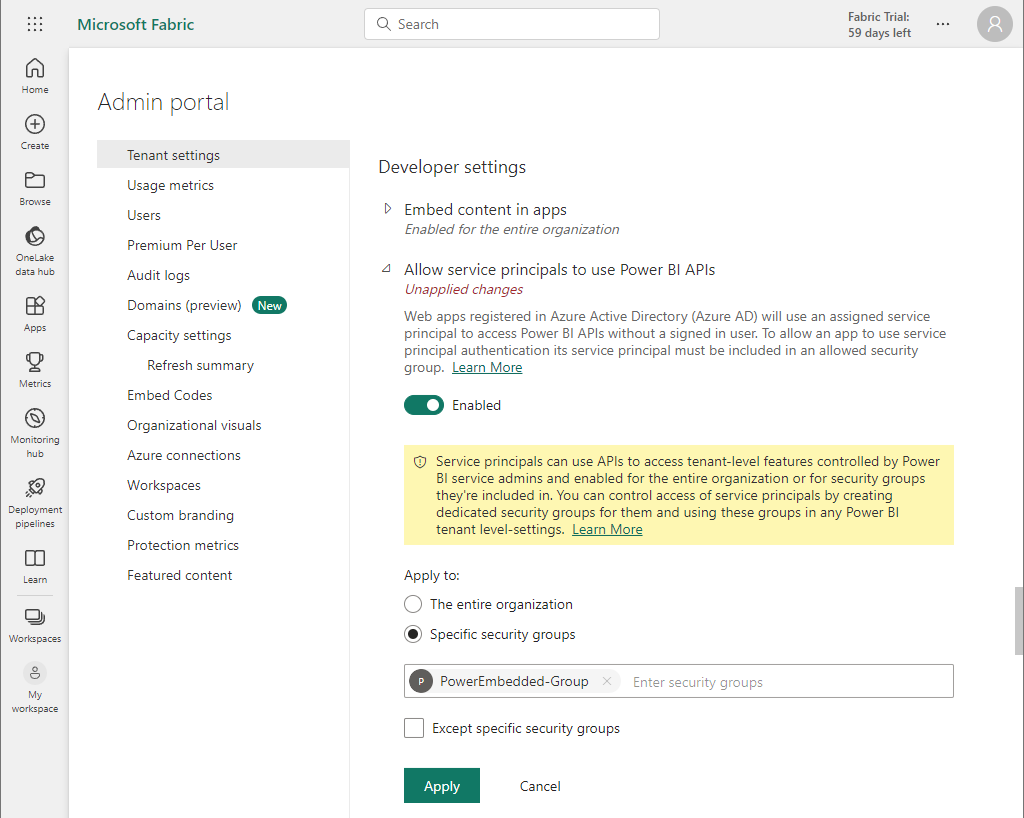
Check the "Allow service principals to use Power BI APIs" option.
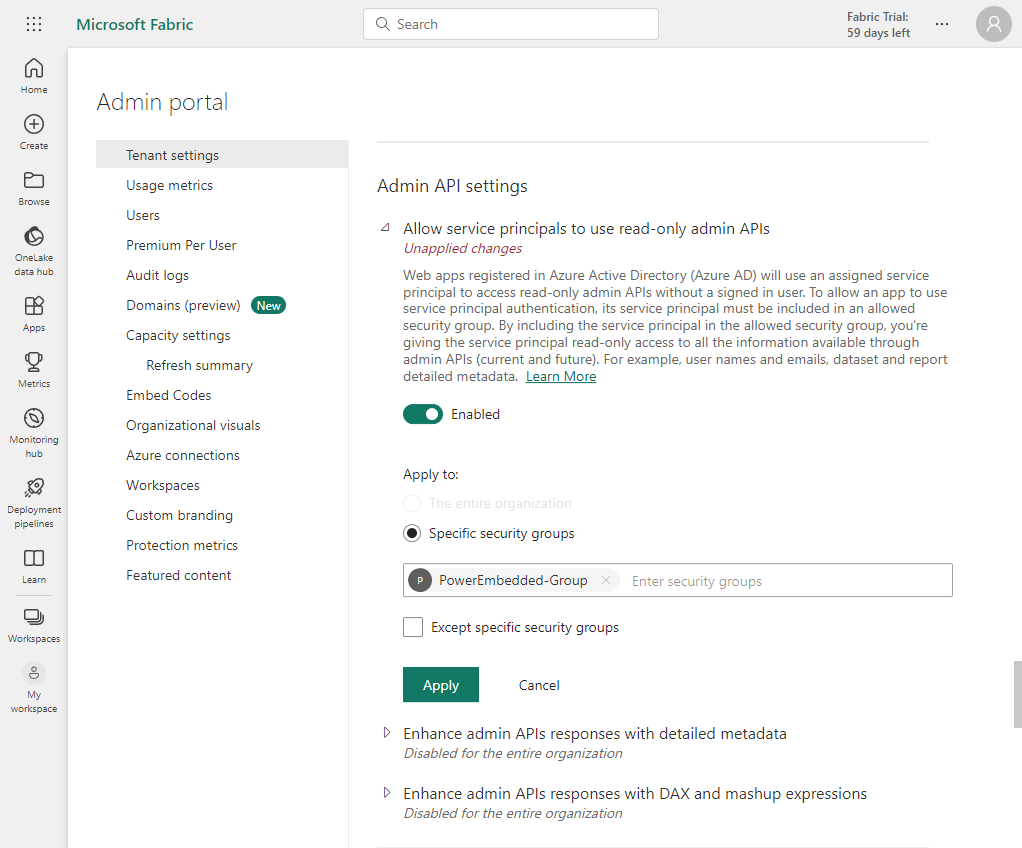
For security reasons, check the "Specific security groups" option in the "Apply to:" section and select the security group we created at the beginning of this topic (in my case, "PowerEmbedded-Group").
Click the "Apply" button.
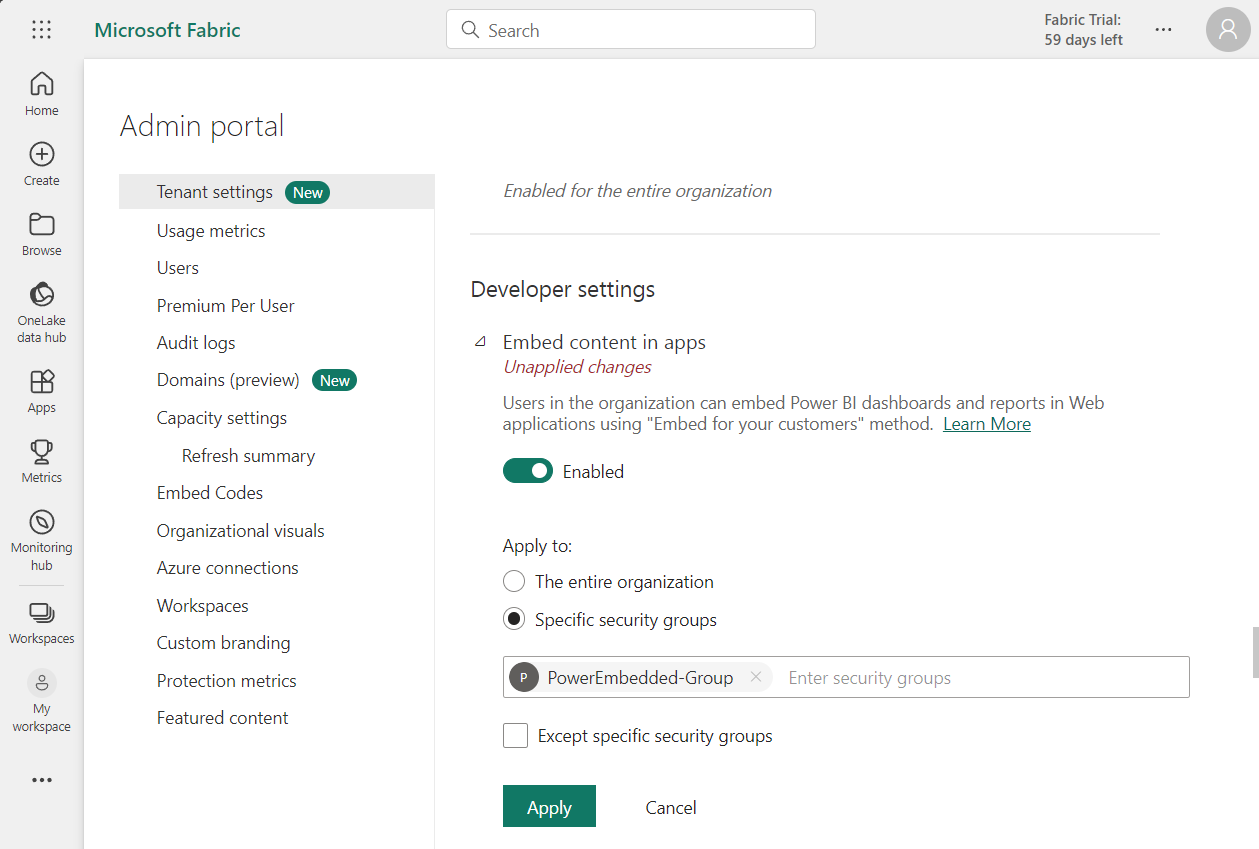
Still in the "Developer settings" category, check the "Embed content in apps" option and add the security group you created in the "Specific security groups" filter in the "Apply to" option.
Scroll down a bit more and repeat the same process for the "Allow service principals to use read-only admin APIs" item in the "Admin API Settings" section.
Done! Now the Portal has access to your Power BI environment.
### First access to the Administrative Portal
Access the administrative area of the Portal by accessing [this link](https://admin.powerportal.cloud/), logged in with a user who has "Azure Global Administrator" permission.
You will authenticate with your Microsoft account and as soon as you finish logging in, you will see a permission request screen in your Azure AD.
**Check the "Consent on behalf of your organization" option and click the "Accept" button.**
{% hint style="warning" %}
Did you forget to check the "Consent on behalf of your organization" option, or did you perform the installation with an account that was not an administrator?
{% endhint %}
Click here to see how to grant the permission manually
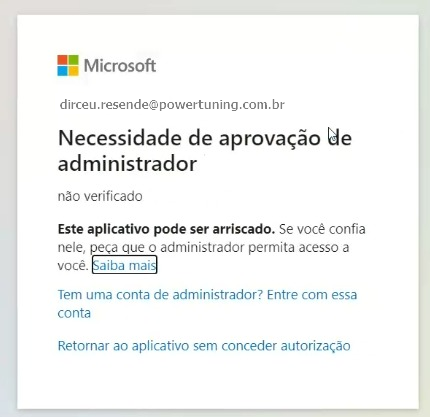
If you accessed the administration portal using a user without the necessary permissions, the screen above may not appear for you, and instead the screen below will appear when you or another user tries to log into the administrative area.
If this happens, you will need to authorize the Power Embedded application (powerportal.cloud) on behalf of the organization, using a user with global permissions in Azure AD.
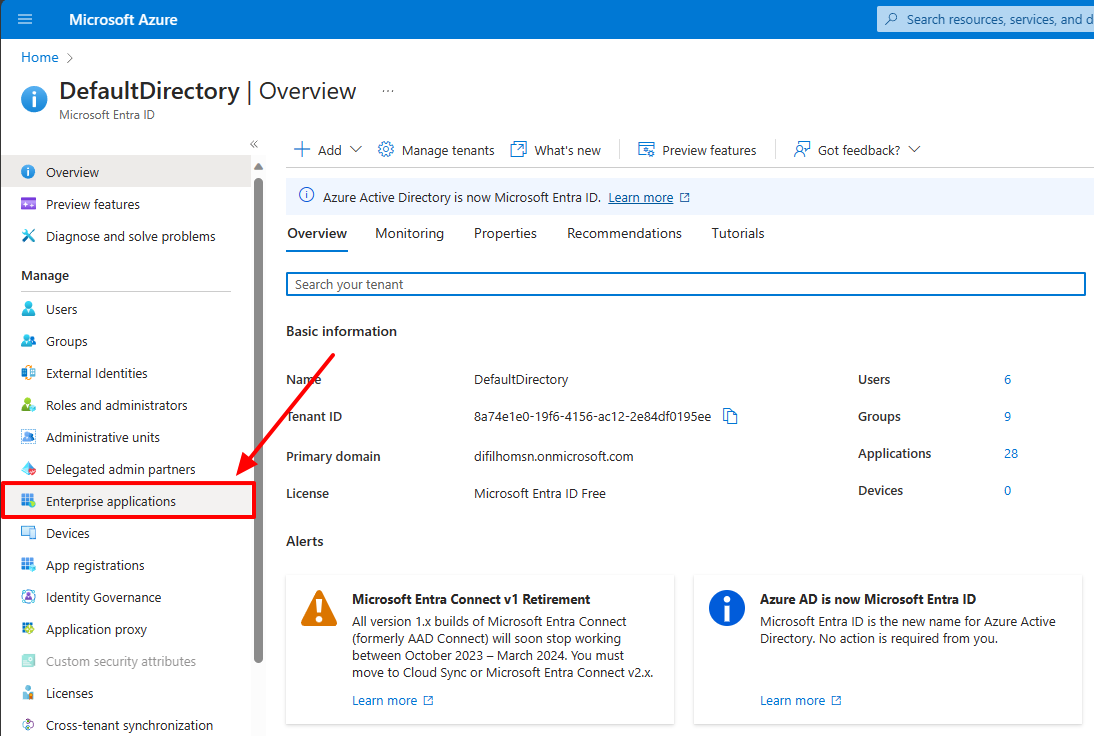
To do this, click the "[Enterprise Applications](https://portal.azure.com/#view/Microsoft_AAD_IAM/StartboardApplicationsMenuBlade/~/AppAppsPreview/menuId~/null)" link in Azure AD (Entra ID).
[](https://powerembedded.com.br/wp-content/uploads/2023/10/Aplicativos-empresariais.png)
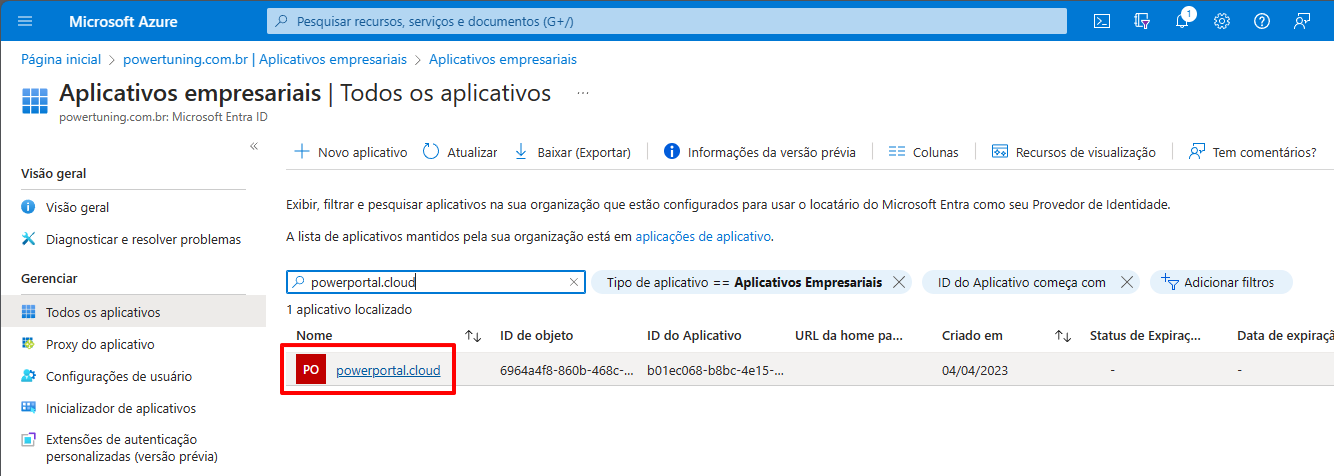
Locate and click on the "powerportal.cloud" application.
[](https://powerembedded.com.br/wp-content/uploads/2023/10/Aplicativos-empresariais-powerportal.cloud_.png)
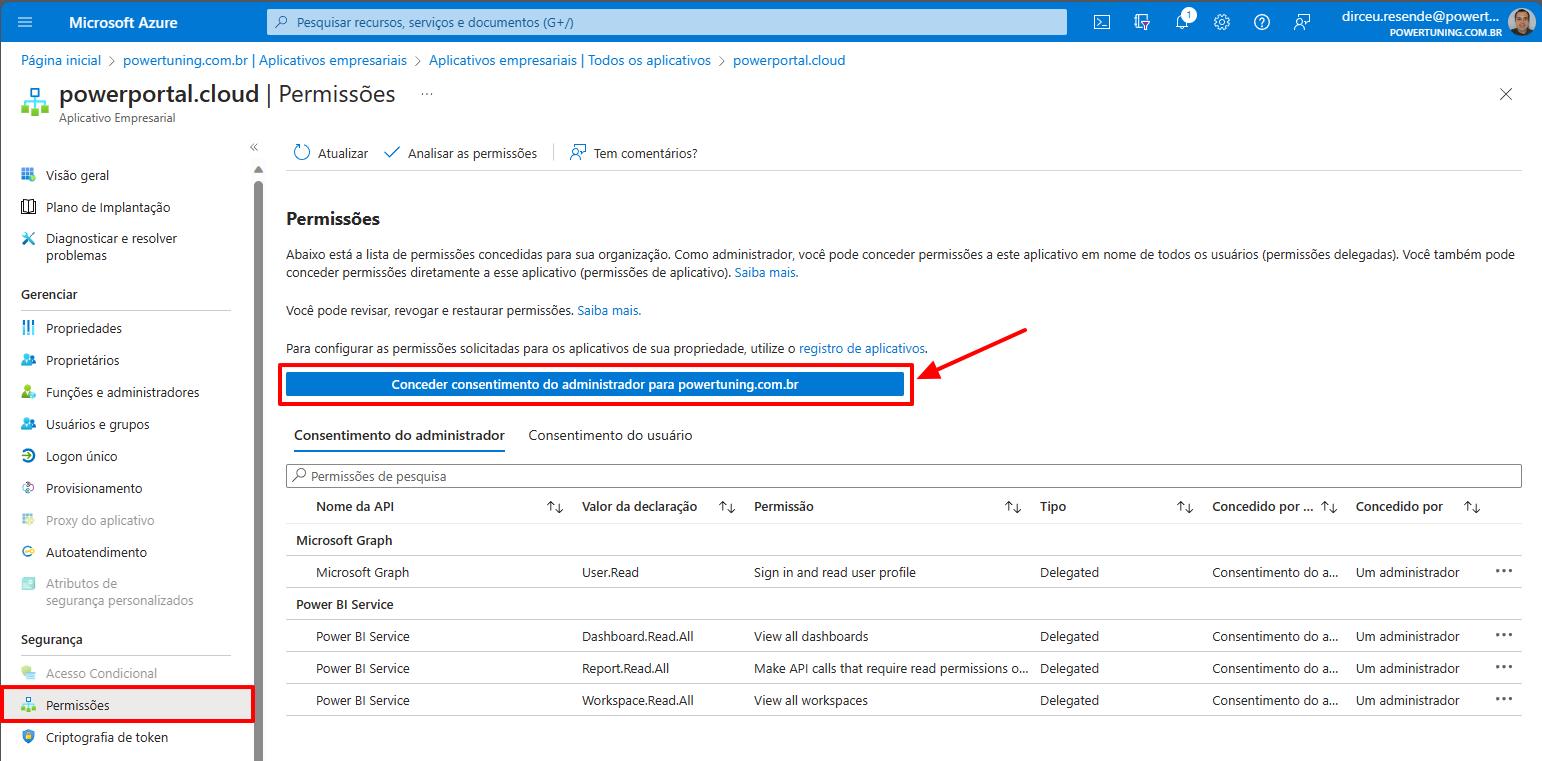
Click the "Permissions" menu in the left panel and then click the "Grant admin consent for ..." button and authorize the application.
[](https://powerembedded.com.br/wp-content/uploads/2023/10/Aplicativos-empresariais-Permissoes-powerportal.cloud_.png)
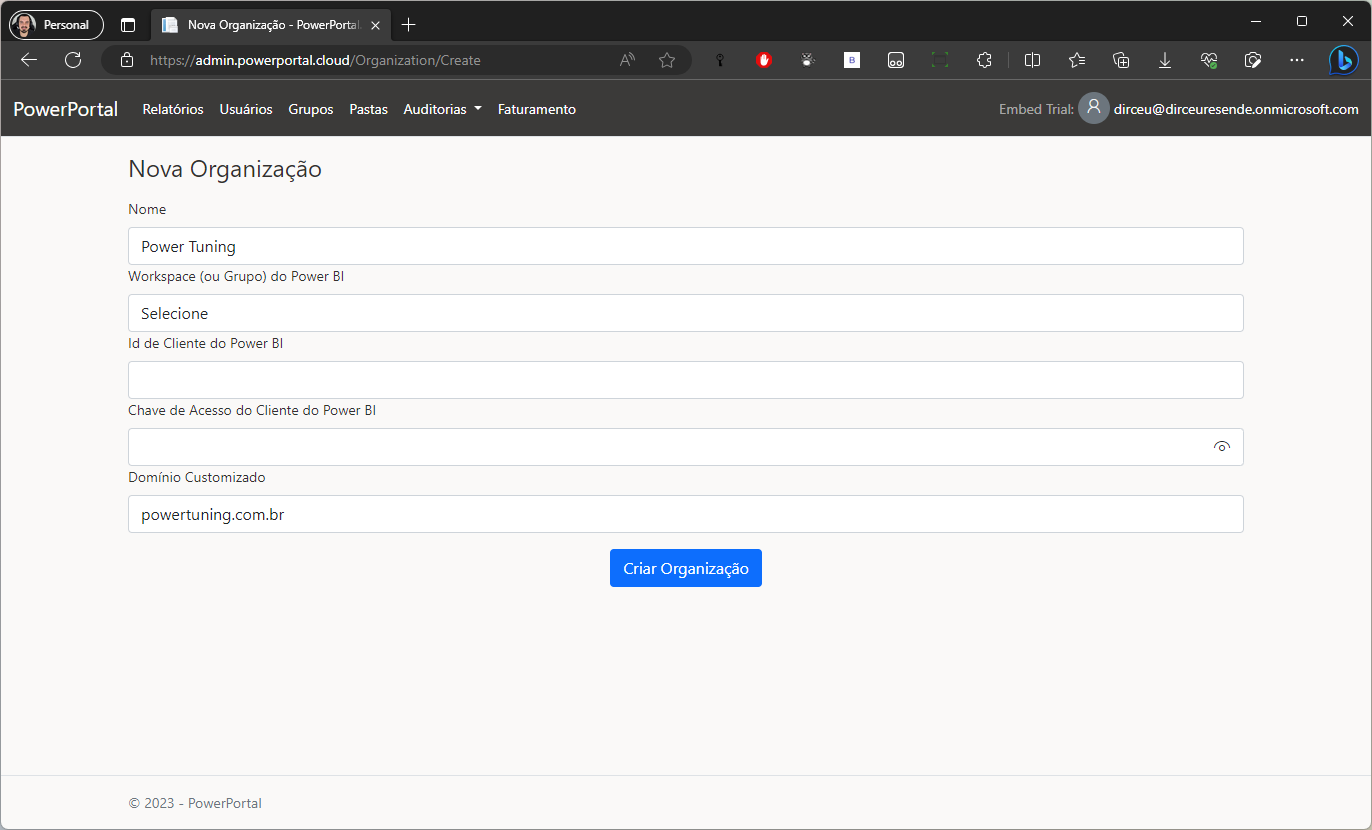
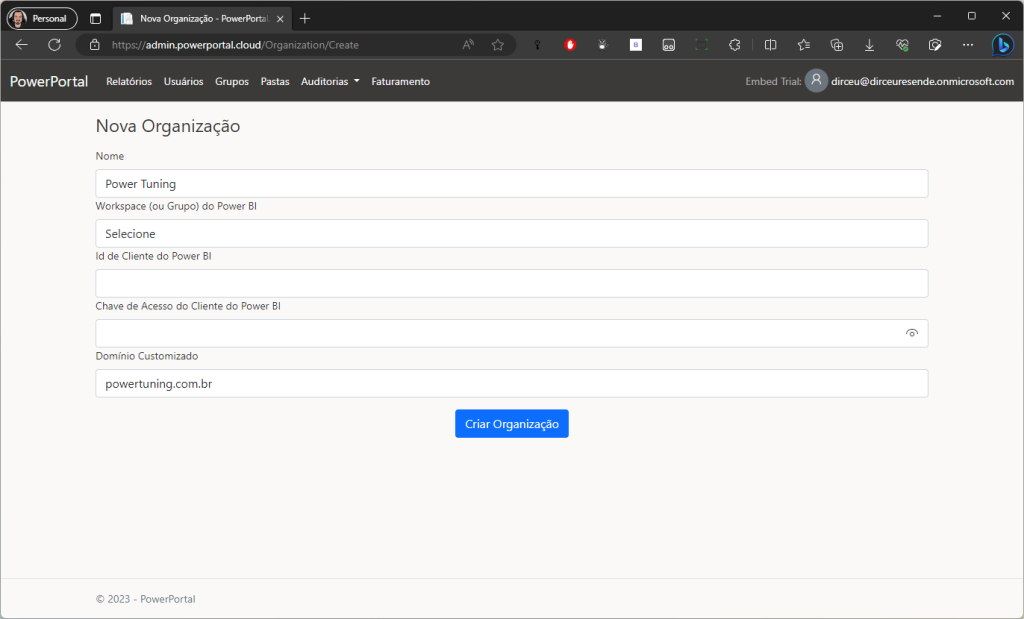
After confirming the permissions, you will be redirected to the system and will need to create the new organization.
[](https://powerembedded.com.br/wp-content/uploads/2023/08/Manual-de-Instalacao-do-Power-Embedded-2.png)
After confirming the permissions, you will be redirected to the system and will need to create the new organization.
On this screen, you can configure the following settings:
* **Name:** This is the name of your company. The system will retrieve the name registered in the Azure Tenant, but you will be able to change it on this screen or later through the system settings page.
* **Workspace:** This is the initial workspace of the system. You can select any workspace at this time, as this can be changed later.
* **Power BI Client ID:** This is the ID of the Service Principal that will be created to integrate Power Embedded with your Azure Active Directory (we will explain more about this below).
* **Power BI Client Access Key:** This is the secret generated for the Service Principal (we will explain more about this below).
* **Custom Domain:** This is your company's domain (without www or https). This field will be used to create a custom access URL for accessing reports (e.g., reports.yourcompany.com.br).
With the Client ID and Secret Value that you obtained at the beginning of the installation and noted in a notepad, we will now use them on the Power Embedded organization configuration screen.
Click the "Create Organization" button and you will be ready to start using the Portal.
### How to integrate the Portal with the Power BI Workspace?
For it to be possible to import Power BI reports into Power Embedded, you will need to do two things in the workspace:
1. Change the Workspace capacity to Premium (Embedded) capacity.
2. Add the created Service Principal (Power Embedded user) as an administrator of the workspaces from which you want to import reports (can be more than 1).
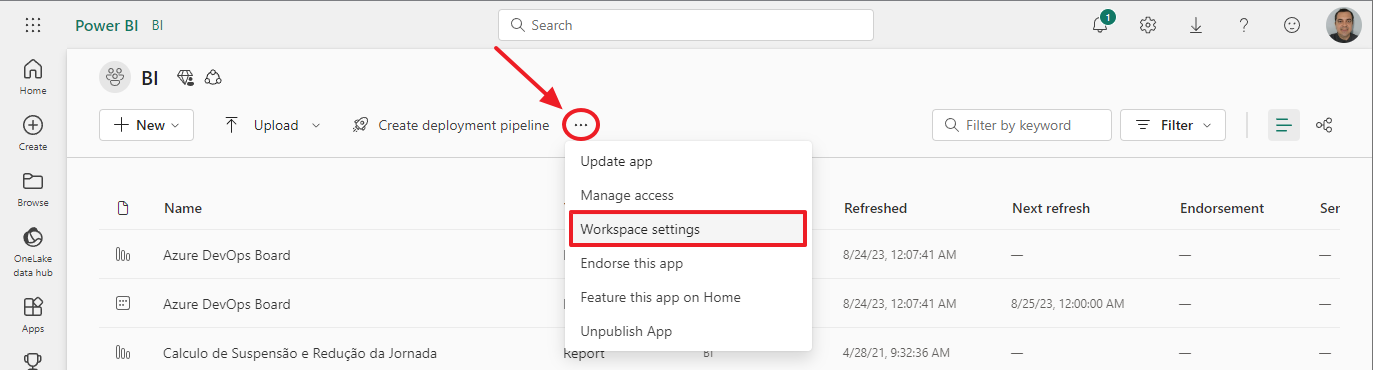
To change the Workspace capacity to Premium (Embedded) capacity, access the workspace, click the 3 dots and select the "Workspace settings" option.
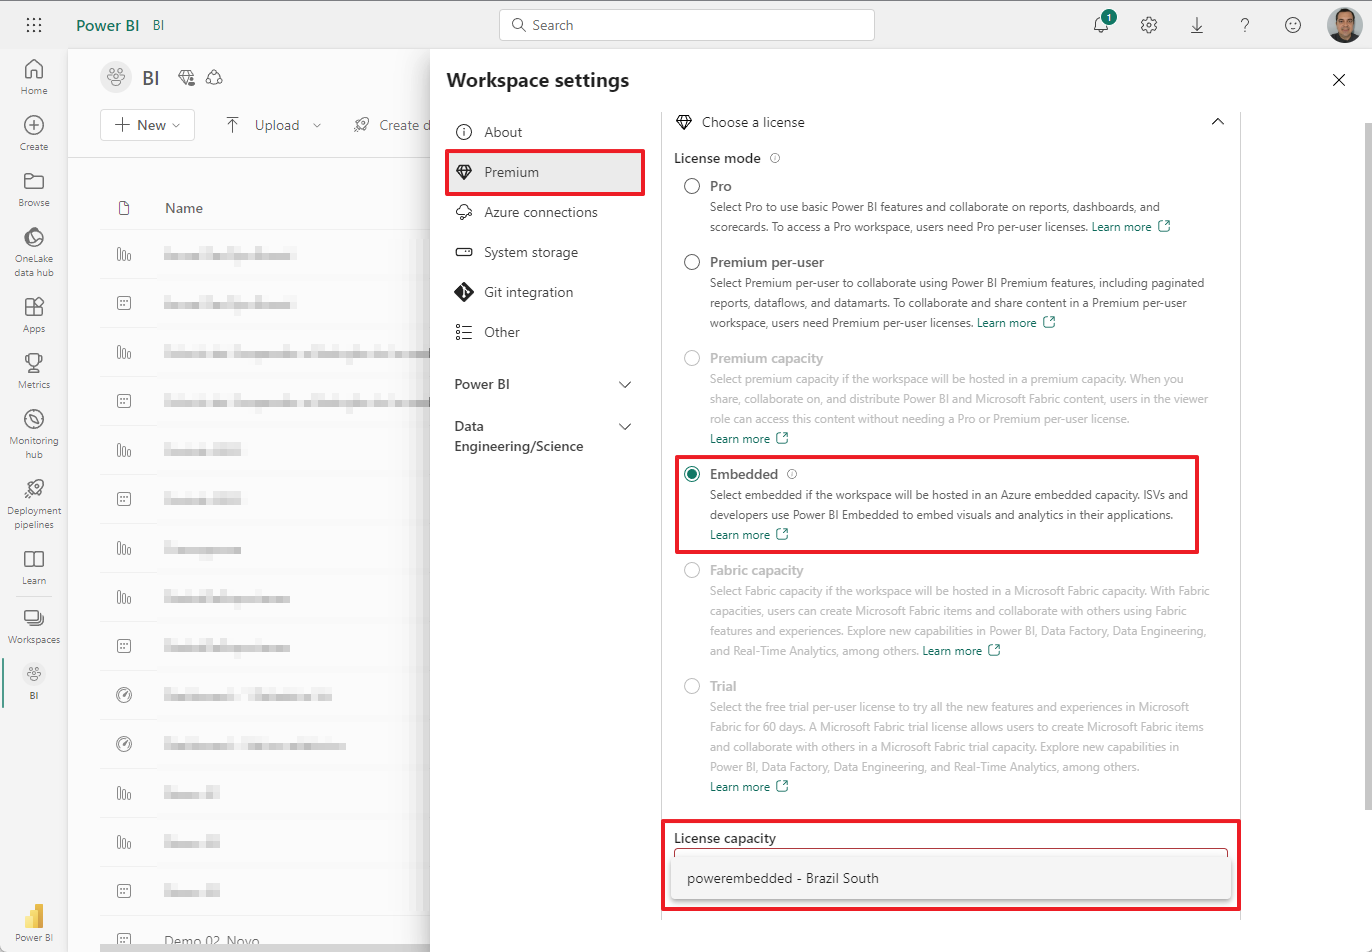
On the screen that opened, click the "Premium" menu, then choose the "Embedded" license and in the "License capacity" field, select the Embedded resource you created earlier from the list.
Click the "Apply" button just below.
From this point on, this workspace is now on Premium capacity and associated with the Power BI Embedded resource. If you pause this resource, the Workspace will become inaccessible, even when using a Pro account and accessing directly through the portal.
The last step now is to add the Service Principal user to the Workspace.
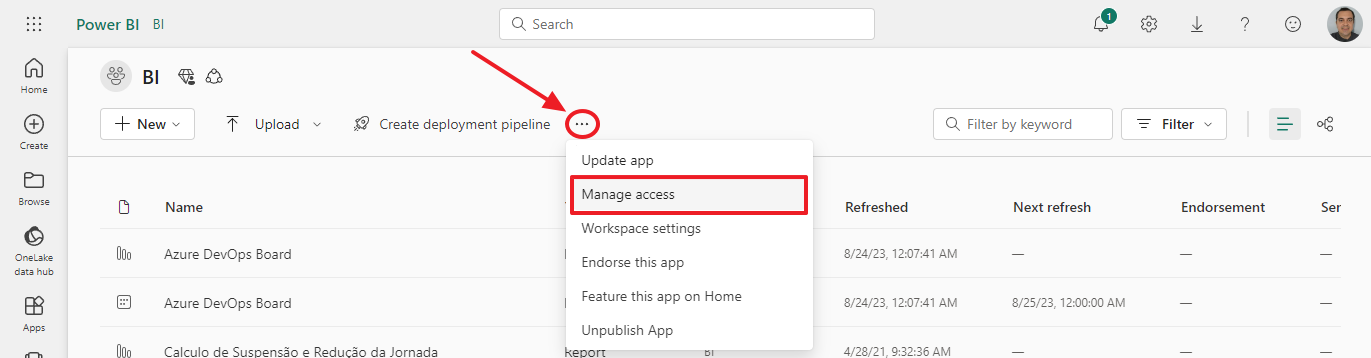
To add the created Service Principal as an administrator of a workspace, access the workspace, click the 3 dots and select the "Manage access" option.
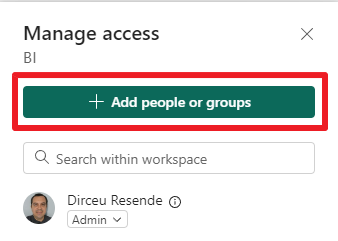
Click the "+ Add people or groups" button.
Search for the name of the group created earlier and remember to change the access level to "Admin". After that, click the "Add" button.
Done! Power Embedded now has access to this workspace. Repeat this for all Workspaces from which you want to import reports.
 If this happens, you will need to authorize the Power Embedded application (powerportal.cloud) on behalf of the organization, using a user with global permissions in Azure AD.
To do this, click the "[Enterprise Applications](https://portal.azure.com/#view/Microsoft_AAD_IAM/StartboardApplicationsMenuBlade/~/AppAppsPreview/menuId~/null)" link in Azure AD (Entra ID).
[](https://powerembedded.com.br/wp-content/uploads/2023/10/Aplicativos-empresariais.png)
Locate and click on the "powerportal.cloud" application.
[](https://powerembedded.com.br/wp-content/uploads/2023/10/Aplicativos-empresariais-powerportal.cloud_.png)
Click the "Permissions" menu in the left panel and then click the "Grant admin consent for ..." button and authorize the application.
[](https://powerembedded.com.br/wp-content/uploads/2023/10/Aplicativos-empresariais-Permissoes-powerportal.cloud_.png)
After confirming the permissions, you will be redirected to the system and will need to create the new organization.
[](https://powerembedded.com.br/wp-content/uploads/2023/08/Manual-de-Instalacao-do-Power-Embedded-2.png)
If this happens, you will need to authorize the Power Embedded application (powerportal.cloud) on behalf of the organization, using a user with global permissions in Azure AD.
To do this, click the "[Enterprise Applications](https://portal.azure.com/#view/Microsoft_AAD_IAM/StartboardApplicationsMenuBlade/~/AppAppsPreview/menuId~/null)" link in Azure AD (Entra ID).
[](https://powerembedded.com.br/wp-content/uploads/2023/10/Aplicativos-empresariais.png)
Locate and click on the "powerportal.cloud" application.
[](https://powerembedded.com.br/wp-content/uploads/2023/10/Aplicativos-empresariais-powerportal.cloud_.png)
Click the "Permissions" menu in the left panel and then click the "Grant admin consent for ..." button and authorize the application.
[](https://powerembedded.com.br/wp-content/uploads/2023/10/Aplicativos-empresariais-Permissoes-powerportal.cloud_.png)
After confirming the permissions, you will be redirected to the system and will need to create the new organization.
[](https://powerembedded.com.br/wp-content/uploads/2023/08/Manual-de-Instalacao-do-Power-Embedded-2.png)