Create/edit user
In this method, you can create users manually, one by one, and assign their permissions, roles, departments, etc.
The user registration process is fairly straightforward. However, the documentation below offers a detailed guide to walk you through this process.
It is important to note that user registration involves several tabs relating to access and permissions within the application. The tabs are: General, Permissions, Groups, Companies, and Assistants.
General
In this tab, you can enter the user's e-mail, name, role, department and expiration date. It also defines the home page after login and the authentication method to be used.
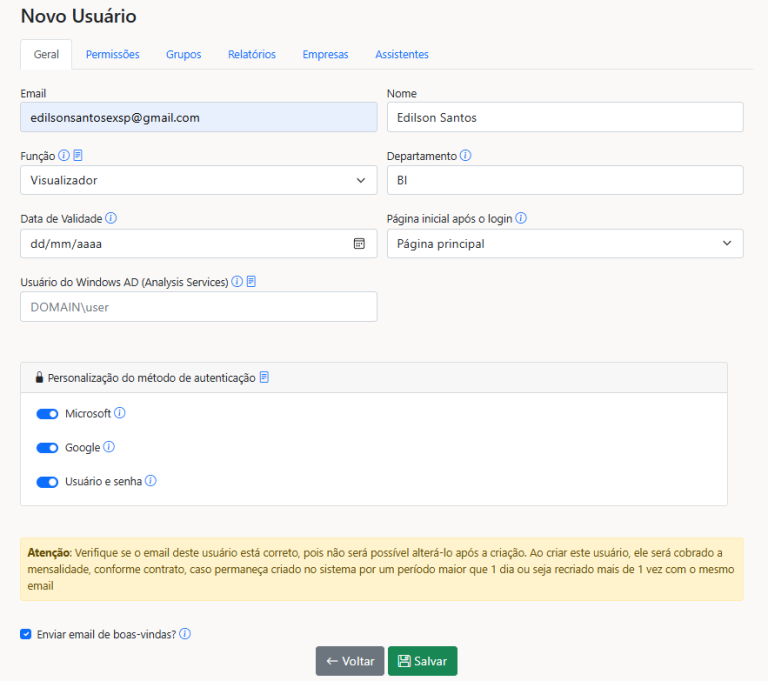
Expiration date: Set an expiration date for the user. After this date, the user will not be able to access the system.
Home page after login: Select a specific page or report for the user to be redirected to immediately after logging in. Make sure that the user has access to the selected report or application.
Authentication method: Choose the authentication method the user should use.
Permissions
In this tab, you define the permissions the user will have when viewing a report.
This includes the ability to download PBIX files, update datasets, among others.
The permissions granted to the user are applied to ALL reports to which that user has access. If you need to limit these permissions to specific reports, release this permission using Groups.

Groups
Here you associate the user with one or more access groups.
To add the user to the group, simply check the groups and then click the “Save” button.
To remove the user from the group, simply uncheck the groups and then click the “Save” button.
When the user is part of a group, the report access permissions, RLS settings and permissions are inherited from the group, which are added to the permissions the user already has.

You can also manage the association between Users and Groups on the group management screen, except that the context becomes the specific group and not the user.
Reports
Here you associate the user with one or more reports. Not even administrator users have access to automatically imported reports. All access to a report must be explicit.
To release access to the report, simply mark the report and then click on the “Save” button.
To remove the user from the report, simply uncheck the report and then click the “Save” button.

You can also manage report permissions from the report management screen, except that the context is now the specific report and not the user.
Company
In this tab, you define the company with which the user will be associated.
This affects the user's visual identity within the application. To associate a user with a company's visual identity, simply link the user to that company. Learn more

You can also manage the association between user and company on the company management screen, except that the context becomes the specific company and not the user.
The association of the user with the company has no influence on the user's access permissions with the report, nor with the RLS or permissions. It only serves to filter and control the portal's visual identity according to the user's company. If the user is in more than one company or none at all, the visual identity will be inherited from the organization's general settings.
Assistants
If you are using Power Pilot (Generative AI) wizards in Power Embedded, this tab allows you to define which wizards will be available to the user.
On this screen you specify which assistants can be used by the user. What is an assistant

Welcome email when registering a user
When registering a user, either by clicking on the “Create user” button or by “importing a CSV file”, it is possible to send a welcome email to the new user.
To enable this functionality, select the “Send welcome email” checkbox.

When this option is enabled, the welcome e-mail will be sent automatically to the new user.
If the user is going to use the username and password login method, they will be able to create their own password via the e-mail they will receive when they click on “Register”.

If the user created has a permission other than “Viewer”, the welcome email will include the link to enter the administration portal.
Atualizado